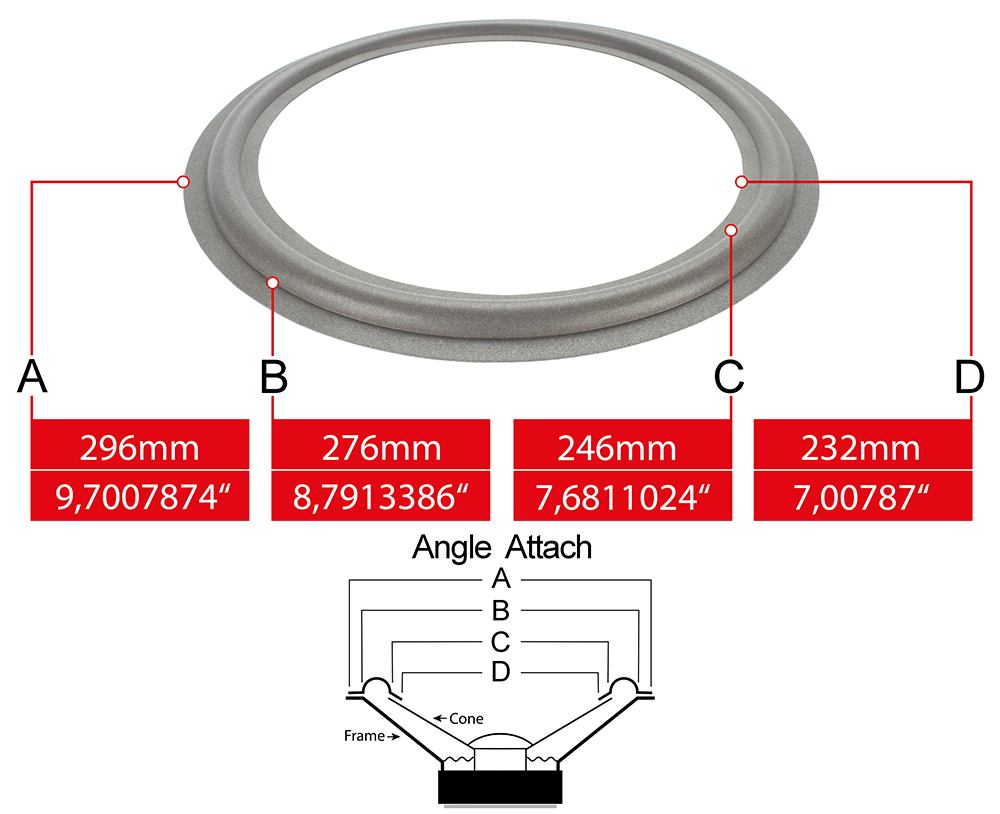
The most common problem with speakers are rotten, torn or damaged surrounds. Constant vibration, moisture and the time cause foam, rubber and cloth surrounds to degrade. This causes distortion or the speaker to lose sound. Our easy to install repair kits will make your old speakers sound just like brand new.
You can repair your speaker with flexible Foam Surround easly and make it brand new with vibrant sound quailty. Our surround has flexiable design, produced by polyether technology, making it durable. polyether foam have excellent heat, light, ozone/weathering, and aging resistance. To correctly repair your speaker, it is sent with repair guide which includes videos and images.
Please check the model and size of your speakers before placing your order to be sure you receive the correct Surround. The Surround can deviate from the original size of your edge by up to 3 mm, this is not a problem during repair.

Product Specifications
| (A) Outer diameter |
296 mm (11-21⁄32") |
| (B) Roll outer diameter |
276 mm (10-55⁄64") |
| (C) Roll inner diameter |
246 mm (9-11⁄16") |
| (D) Inner diameter |
232 mm (9-9⁄64") |
| (E) Roll width |
14 mm (0-35⁄64") |
| (F) Thickness |
0.7 mm (0-1⁄32") |
| (G) Height |
7.5 mm (0-19⁄64") |
| Form |
Angle |
| Material |
Foam |
| Color |
Black |
| Model Compatibility |
Multicel MB-30B |
| Kit Contents |
2X Surrounds, 20g Adhesive, Repair Guide |
|
✔️ Lifetime Warranty
✔️ German produced flexible Surrounds are being used by many speaker producing companies
✔️ Amazing sound quality with extra flexible design
✔️ Special polyether made foam for high elasticity and durability
✔️ Special polyether made foam much better resistance to heat, light and ozone
✔️ We are shipping the same high quality parts that professional speaker producing companies use
✔️ Our easy to install repair kits can be installed without removing the dust caps
✔️ Dust caps, gaskets, cones and shims are available for most models in stock
✔️ Our exclusive drying rubber based repair elastic adhesive is designed for paper, poly, metal, and composite cones
✔️ Repair guide with images and videos
✔️ Original design for 4200+ speaker models
✔️ Thousands of customers have installed our speaker foam repair kits successfully
✔️ Easy to follow illustrated instructions
✔️ Installation average time is 30 minutes per speaker
✔️ Your speaker will sound as first day with our easy to install repair kit
✔️ We quickly ship your order worldwide
✔️ Lautsprecher Technik has been the leading supplier of loudspeaker parts since 2010